A2Z
Background
This 16” cedar canvas canoe was built in the early 1970s by Camp Nominingue (QC) and the canvas was last replaced in the early 90s also by Camp Noniningue. The canoe was unused for the last 10~ 15 years, suspended upside down under a deck (so very good air circulation). However, the paint is now heavily dried and flaking. There are two ribs that appear to have a surface crack and is hard to determine how deeply those may penetrate with the skin on, and therefore whether they need to be replaced. The canoe originally had no keel.
.jpg)
.jpg)
Starting Point
The first step to understanding the canoe is to know its origins. I am lucky because I do know that A2Z was built by Nominingue Camp. Their history of canoe building is quite interesting and it gives me a sense of the people who have worked on this boat. You can see their history here.


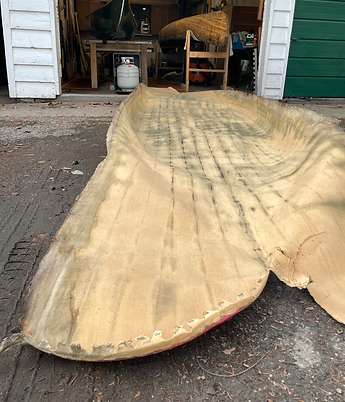
Removing the canvas (I call it the skin) is always the first step to getting to know the canoe I'm working with. I can see the past repairs to planks and the interesting way they tacked the canvas to the ends. I will try and follow the same pattern.


Ribs, Tips, and Gunwales
There are a couple of troublesome areas that will need attention before putting on a new canvas. The ribs inside the canoe have some hairline cracks. After further investigation, the intrusion doesn't seem to pose any problem to the canoe and it would be more invasive (and costly) to replace the whole rib. Therefore, I will fill exposed spots with epoxy and focus attention on the rib tips and outer gunwales.
The outer gunwales were built in two sections connected by a scarf joint in the midsection (1:6 ratio!). Although Pat and I spent time sanding them down, there was too much degradation to salvage them, so new ash outer gunwales will be installed.

.jpg)
.jpg)
.jpg)
Putting on the Canvas
Ok, so a couple of things are happening here. One, I love tacking in the canvas. I love stretching it over the hull taut. I love hearing it groan as it forms to the shape of the canoe. Second, I realized the unique wave design of the canvas folded across the bow and stern (see image above) is to accommodate the excess canvas that would fold as the canvas is pulled over the rounded ends. It makes sense and I am mad at myself for not realizing that before. I will follow the same pattern as I recanvass the ends.


Burn, Wash, and Fill
I use a propane torch to burn off fuzzy bits on the canvas that would impede the smooth application of the filler- basically, I'm burning off all the furballs. A wash with hot water tightens up the canvas. Then it's time to apply the filler.


Attaching the Keel
With the help of my good neighbour Pat, we attached the keel and used the extra filler to seal the seam along the keel and the hull. The extra pair of hands makes a big difference as I need to climb under the hull to get the screws in tight.

A Tale of Two Projects
Although the space is challenging, I like to have 2 projects on the go. While one canoe is drying, I can be working on the other.


The Paint and Gunwales
I try to be as efficient as I can (especially with so many projects in line) so I am varnishing the outer gunwales as I am painting the hull. Interestingly, the original outer gunwales came in two sections connected by a scarf joint. I will replace them with one full section using ash wood.


A2Z on the left and Scott's Scott on the right
Gunwale Day!


Moving On
Whenever I start a project, I initially get overwhelmed with the work that needs to be done. But once I take out the first screw, the canoe starts to tell its story and I listen. Piece by piece, I slowly work through the process of restoration imagining the trips, the currents, the people who have been along the journey of this old boat. I am told the boat is being handed down to a family member; a new owner, a new adventure waiting. May you find calm waters, short portages, and the wind at your back.


